Normally the brewing profiles are part of a recipe however you can also create a standalone brewing profile. To create a brewing profile for the Pico Z / Zymatic click on the Brewing Profiles tab.

Next click on the New Pico Z / Zymatic Profile button.

The Pico Z / Zymatic brewing profile will look like the screen below. This is divided into different sections and will be explained in detail below.

The top left section is the Recipe Information. You will enter in the Recipe Name in this section. The Recipe name will be the option you will choose on your Pico to brew this brewing profile and it will be displayed on the Pico’s screen during the brewing session. This will also be used in the My Brewing Log after you have brewed.

The top center allows you to select a mash profile based on the beer style. You can also select from other mash options in another section of the brewing profile screen.

The bottom left is the recipe details section. In this section you will enter the batch size in gallons or liters, the temperature you want to use for the boil as well as how long of a boil time. You’ll also enter the weight of the grains and hops in this section which is used to calculate the starting water amount.

In addition to the above information you also can select if you are going to be using a chiller after the brewing session has completed.

If you are going to be connecting a chiller select YES otherwise select NO.

The center section is the infusion schedule. In this section if you did not choose a beer style then you can choose from the Infusion options in this section.
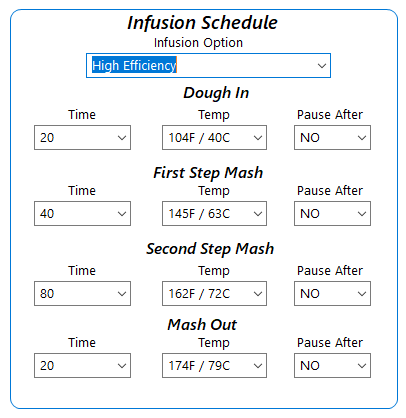
The Infusion option contains a High Efficiency, Mult-Step, Single and Single with mash out option.

The Mash Times and Temperatures will be filled in for you based on the infusion option (beer style or other) you selected. You have an additional option to have the Pico pause and wait for you to allow it to continue after any of the mash steps. This can be used to manually add an ingredient when needed.

If you do not need the Pico to pause after any of the mash steps then leave the default option which is NO for each of the steps otherwise change to YES for the step that you want the Pico to pause after.

The bottom right section is for the hop additions. First select the number of hop additions that you need.

In this example we are going to have two hop additions so we would select the 02 option for the number of hop additions. From this point you would enter the total amount of time for each hop addition as well as the temperature, use and if you need the Pico to pause after the hop addition. SBC will calculate the direct and cascading time for each of the hop additions so each hop will get the total amount of time you have selected.

Click the Review Brewing Profile button located at the bottom right to review all of the steps the Pico is going to complete.

If you are satisfied with the brewing profile then click on the Save Brewing Profile To OnDeck button otherwise you can click on the Return To Brewing Profile button to make changes. Saving the brewing profile to your OnDeck makes it available to your Pico Z / Zymatic to brew.
